Pwnlab Init – Vulnhub
Lets start by gathering our nmap scans. I always do a basic nmap just to get the services and ports and then a detailed nmap from there.
nmap -T4 -p- 10.0.3.21
sudo nmap -A -O -p 80,111,3306,39423 10.0.3.21
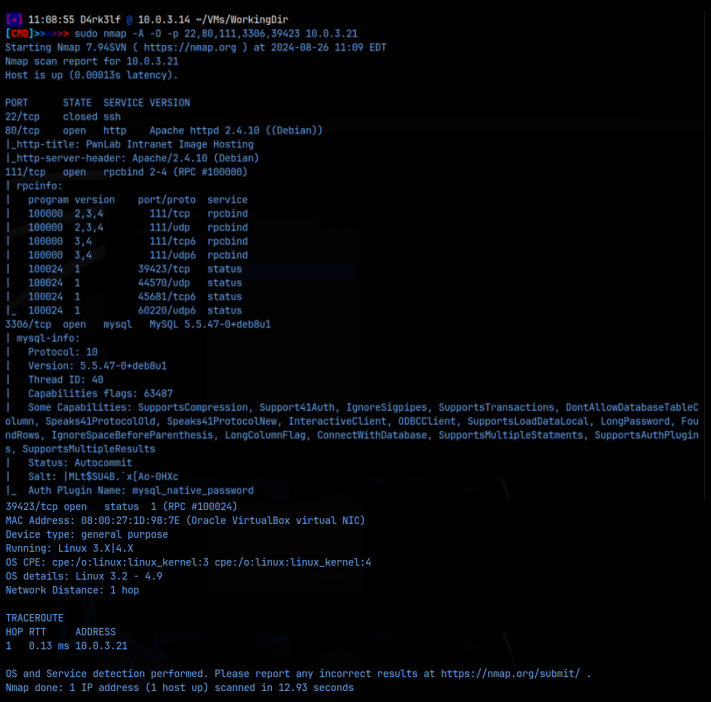
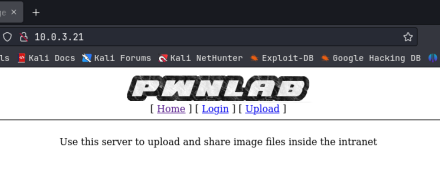
As we can see from the detailed nmap scan, we got the web server on port 80, mysql running on 3306, and some rpc services on 111 and 39423. We also know this is a Debian Linux system. Interestingly, ssh is not available. When we look at the webpage, it seems pretty simple, with just 3 links, the homepage, login, and upload.
We don’t have and credentials to login with at this time so that’s not going to be of much use. I searched the source code of every page which turned out to be pretty scarce. I also checked for robots.txt, .svn, and .DS_STORE files but they were not present either. In a feroxbuster scan, I found index.php, /images, upload and config.php. Wappalyzer indicates that this page is running php so I added that to my notes. I tried to get the config.php page to appear but it hung and was blank.
Interestingly, when we click on a link, we see the URL change to display a web parameter. Maybe this is vulnerable to LFI and we can use it to view the /etc/passwd file? I tried that but no.

When we click on the upload link, we are taken to a page that allows us to upload a file. I created a test.txt file just for testing this upload and tried to upload it, but got the following error:

So there must be a filter checking the files to see what we can and cant upload, and they must need to be some kind of picture. Can we upload a php webshell labeled as a png file? No, tried that and it failed, different error though. Lets try to see what’s in that upload file we found in the feroxbuster scan.
I tried to access this via LFI but couldn’t get it to load. I then tried to use a php filter to get it to load. In the URL, I put:
10.0.3.21/?page=php://filter/convert.base64-encode/resource=upload
This filter should return us a base64 encoded version of the upload file that I suspect is filtering the files that are trying to be uploaded. If we copy the string and then decoded it, we get the file contents. Looking through this, we find a ‘whitelist’ array variable that is limiting the file types to .jpg, .jpeg, .png and .gif, but we tried a png labeled php webshell and that didn’t work. We can try to trick the web server by telling it that the file being upload is actually a gif file, by inserting ‘GIF89a’ as a header in the webshell itself, right at the top, before the php code starts. I did this and then tried to upload the file again and it worked!
When we navigate to the /uploads extension, we can see the file, but it has been automatically renamed:

I setup a pwncat listener on 9090, as this is the connect back port I configured in the webshell, and activated the revshell.png file, but I did not get a connection. There must be something else going on that is stopping this.
I then tried the same filter but tried to access the config.php file as the resource, instead of ‘upload’. I then decoded the returned base64 string, expecting to get some information on whats going on with the revshell, but got this instead:

These look like mysql creds! I added that to my notes. We’ll come back to this but 1st I need to see if we can get a reverse shell on the system somehow. The last file I know of to check is the index.php file we found earlier. Using the same filter again, I decoded the returned string. Before the home page loads, there is a small php code section that calls a language variable as a cookie. We can actually exploit this to call our reverse shell instead.
To do this, I spun up Burpsuite and captured a GET request of the home page. The GET request shows a cookie that contains the PHPSESSID value. This is what we will change to the language value instead. And instead of calling a language, we will call our reverse shell:

Before sending this through, I made sure my pwncat listener was setup on 9090. This should then call our shell, and we should get a reverse connection:

Excellent, we got our initial foothold! Now lets check out those mysql creds using:
mysql -u root -p and a password of: H4u%QJ_H99
Great, we got in. Lets checkout that Users database that the credentials referenced:
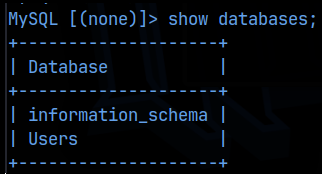
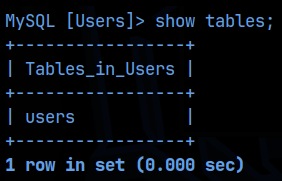
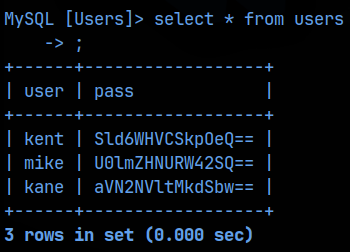
Very nice! Looks like we got base64 encoded creds for users kent, mike, and kane. I added all those to my notes and then decoded the passwords. The passwords look like a just a jumble of letters, but I didn’t recognize any potential encodings they might be, so I recorded them as is in my notes in the passwords file. I’ll confirm if they work later.
Now that we have a foothold on the machine, I moved over my enumeration script and ran it, but you could do all the enumeration manually as well. From the /etc/passwd file, we confirm the users on the machine, and find a new one, john.
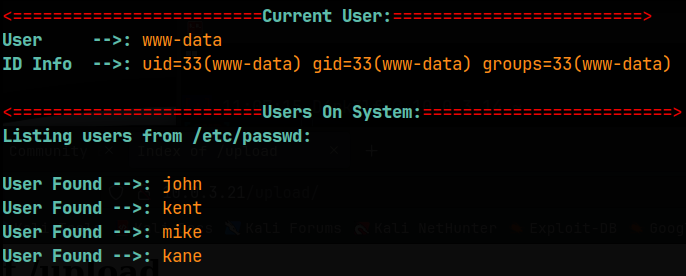
We can’t run sudo as the www-data user. Ssh keys won’t be present either since ssh is not configured on the machine. I didn’t find anything useful in any of the normal locations, which included: /home, /tmp, /opt, /srv, /root, /var, and /etc. My script checked the permissions on /etc/passwd and /etc/shadow but they were not writable, and /etc/shadow was denied to access. It also checked cronjobs but found none. It then enumerated the networking, services, mounts, and NFS but again found nothing. The same was found for SUIDs and GUIDs, and nothing had extended capabilities set on them, that I could use for privesc. Finally, it checked for useful software and for files containing keywords as follows:
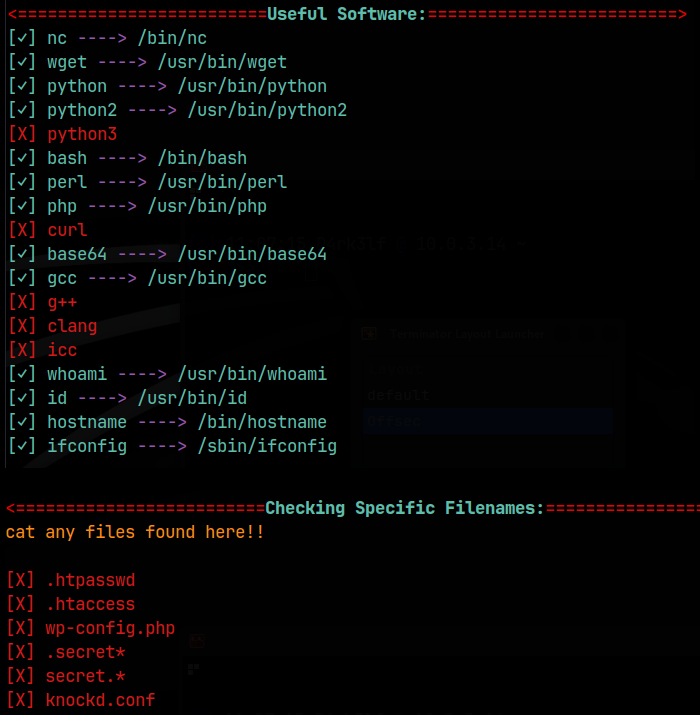
That doesn’t leave us with much, as we can’t even look inside the home directories of each user. At this point, I thought about the creds we found in mysql database and thought, maybe we use those creds to become those users. We can’t ssh in though, so maybe we just supply the passwords in a ‘su <user>’ command, and that worked! Well, at least for kent and kane. I don’t have john’s password yet, and the password set for mike failed.
I checked kent’s home directory but there was nothing useful there, and sudo was not allowed. I then moved on to kane and checked his home directory. There I found a binary that had the SUID bit set, called ‘msgmike’ which was owned by mike. I tried to run it just to see what would happen, but it error-ed out saying:
cat: /home/mike/msg.txt: No such file or directory
Meaning that the script is trying to cat out the file msg.txt which apparently does not exist. I tried to open the binary in nano to check it’s code but it was unreadable. So I ran strings on the binary and sifted through the output until I found a line that read:
cat /home/mike/msg.txt
Notice that the script appears to be using the relative path of the cat binary instead of the absolute path. If we could create our own binary called ‘cat’ and then change the PATH environment variable to look in /home/kane 1st, then we might be able to exploit this misconfiguration and have our new ‘cat’ binary spawn a reverse shell instead. That should give us access as mike, since we can run /msgmike as the mike user, thanks to the SUID bit being set.
I created a binary called cat in /home/kent with the following simple code:
#!/bin/bash
/bin/bash -p
I then exported a new PATH variable using:
export PATH=/home/kane:$PATH

I then ran the msgmike binary and presto, we are mike! Nice, now lets check in mike’s home directory and see if there is anything there we can use. Sure enough, there is a new binary called ‘msg2root’. That file has the SUID bit set as well and is owned by root. This must be the way forward to the root user. I tried running it to see what would happen. I got a prompt asking ‘Message for root:’ to which I just put ‘hello’. The binary echoed hello back to me and then exited. Nothing else. I then tried again with ‘test’ and got the same result… Hmmm, I ran strings on this file and found this line:
/bin/echo %s >> /root/messages.txt
;*2$”(
So, the binary is just echoing out whatever the user inputs, and then appends it to the messages.txt file in root’s home directory. I didn’t catch it at 1st, but on a second look through, that second line had a ‘;’ and then seem to be some kind of variable starting to get assigned. I though maybe it was accepting a second agrument in the prompt and then doing something, I don’t know what, with it..
I tested this theory by running the binary again. This time I put test, following by ‘;’ and then ‘id’. When that ran, the script echoed out ‘test’ but then it also ran the ‘id’ command. The UID and GID both belonged to mike, but the EUID and EGID were both root. That means this script is running with the privileges of the root user, which makes sense because its owned by root and has the SUID bit set.
Instead of using ‘id’, if we use ‘/bin/bash -p’, that should call a bash shell for us, with the elevated privileges of the owner of the script calling the bash shell, in this case root, thereby giving us a root bash shell. I tried that and it worked!!
We are root!!
All that’s left to do now is get the flag at /root/flag.txt!

