Ha-Natraj – Offsec PG Play

Let’s start by gathering our nmaps scans. I always run a basic nmap scan, as well as a detailed nmap scan:
nmap -T4 -p- 192.168.218.80
sudo nmap -A -O -p 22,80 192.168.218.80
Looking at the detailed nmap scan, we see we have ssh running on port 22, and we can see the website on port 80. We also know that we are dealing with some kind of Linux based machine:

Navigating to the website, we see a number of pictures, and some text in relation to the Hindu god Shiva. Checking the /robots.txt, /.svn, and /.DS_STORE extensions gives us no further information on the website. Similarly, we find nothing useful in the source code.
A Ferric Oxide (FX), and nikto scan of the website shows us that there are a number of other extensions. We get the /images extension which is where the website images are stored at, and interestingly, a ‘/console/file.php’ extension. If we navigate to that, we see:

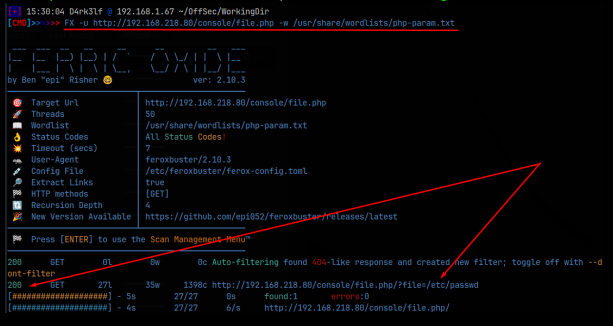
We select the file.php to open it, but we just see a blank page. This suggests that there might be a vulnerable URL parameter that we can access. To test this, I’m using a script that appends a user supplied string to a list of common URL parameters, which then outputs the combined values into a list which we can use to fuzz with, with Ferric Oxide, Ffuf, gobuster, or any other directory busting tool. My favorite is Ferric Oxide, so that’s the one we will use. I want to test if we can use a vulnerable URL parameter, to abuse a Local File Inclusion vulnerability, and access a file on the machine, this being the /etc/passwd file. I’m going to supply ‘/etc/passwd’ to the script, and then used the outputted wordlist in Ferric Oxide:

Ferric Oxide shows a 200 response code on the parameter ‘/?file=’. Following the link, the URL returns the /etc/passwd file, confirming the LFI vulnerability through the vulnerable URL parameter! The following image shows the source code of the returned URL, so we can better read the /etc/passwd file:

We see that there are 3 users on the system; root, natraj, and mahakal. I tried using the same vulnerability to read the /home directories of these users, but couldn’t find an login creds like ssh keys, further, we are not able to read the /etc/shadow file. Ssh logs are stored at /var/log/auth.log, and that file was readable. If we can poison the log, we might be able to insert a webshell, by which we could run commands on the system. If we can do that, we should be able to run a command that will give us reverse shell on the system.
Let’s test this by attempting to poison the log file with some php code. 1st, we need to connect to the machine’s ssh protocol with netcat:
nc -nv 192.168.218.80 22
Now we submit our ‘poison’ string, along with our php code that to gives the webshell. We want the ‘poison’ string to be something we can easily pick out in the returned log file when we call it using the vulnerable parameter, so I’m going to use the following:

Now, using the vulnerable parameter, we should be able to call the log file and attach ‘&cmd=(some command)’ to the end of the URL, and if everything worked correctly, the command that we supply should be run, and we should see the output in the log. To test this, I’m just going to run the ‘id’ command:

Perfect, it looks like we can indeed run commands on the system through our poisoned log. Sometimes when we run command in this way, we can run normally formatted commands, but often times, especially with more complex commands, we need to URL encode these before we run them. This turns out to the be the case on this machine as well. The easiest way I’ve found to URL encode commands is to install the hURL tool, copy the command to a file called ‘cmd.txt’ and then use the tool with the -f flag to encode the contents of the ‘cmd.txt’ file. The tool will output the encoded command on the screen, allowing you to simply copy and and paste it into the vulnerable URL on the machine. My next step was to find out which python was available on the machine, and that turns out to be python3. We can now head over to revshells.com and put in our information to get the correct python3 command to give us a reverse shell. I then copied that command into a file called ‘file.txt’ (doesn’t really matter the name of the file) and then used the hURL tool to encode the python3 reverse shell command:

I then copied this command into the website URL following the ‘&cmd=’. Before sending the URL, I setup a netcat listener on port 4444, and we get our reverse shell!:

With our foothold on the machine established, we can now start the enumeration process. We have accessed the machine as the www-data user, but we don’t have a full tty at the moment. I stabilized the shell using python. Check my ‘Resources‘ page to see this process.
Now that we have a full tty and a stable shell, we can proceed with enumeration. I use a script I custom wrote for enumerating Linux machines, but you could manually do this as well. Both processes will show you that checking the sudo permissions of the current user reveals that www-data can run some systemctl commands:

This is interesting. Currently, the apache2 service which runs the website on the machine is running under the www-data user, which should be the default setting. But if we can change that, and then restart the service, we might be able to reuse our poisoned log file command vulnerability to regain access to a reverse shell. We should then be the ‘APACHE_RUN_USER’ of whoever we select. Note; the reason we need to regain the shell is because we will lose our reverse shell connection when we restart the apache2 service. We need to be able to change the configuration file for apache2. That file can be found at /etc/apache2/envvars. As it turns out, as www-data, we can indeed edit that file. Within the file, we need to locate the following lines:
User ${APACHE_RUN_USER}
Group ${APACHE_RUN_GROUP}
And then change them to:
User mahakal
Group mahakal
Here I have selected the mahakal user. Feel free to try the natraj user or even root, as I did not try these. After saving the changes, we then run the command to restart the apache2 service, which forces us off the machine. Using the same method as before, we regain access to the machine, and we are the mahakal user! Now we can restart our enumeration process. Again, checking the sudo permissions for mahakal, we see that mahakal can run the nmap command as the root user. Let’s check GTFObins.github.io to see if there are any known vulnerabilities for nmap which may lead us to the root user.

Oooo, this seems promising. It looks like if we create a file which contains the string ‘os.execute(“/bin/bash”)’, we should then be able to use the –script flag with nmap to execute that file, thereby giving a bash shell. Further, if we run the nmap command as the root user (which we know we can do from the sudo permissions check), then the shell that is returned should be executed with the permissions of the root user, effectively giving us a root shell! Let’s try this process.

YESS!! We are now the root user! All that’s left to do is grab the flags.


